Add More Storage to Firestick (Fire OS 6)

Following this guide, you will discover how to add more storage to a Firestick or Fire TV running Fire OS 6. This includes, but is not limited to, the Fire TV Stick 4K (1st Gen) and Fire TV (3rd Gen).

The Amazon Firestick is a popular streaming device that offers excellent value for money and can be jailbroken with minimal effort. It is a perfect choice for anyone looking to cut the cord, regardless of their experience with streaming devices.

However, just like any other streaming device, you must maintain your Firestick correctly to avoid issues. For instance, running out of storage is one such issue. But what can you do if you need more space? Adding an external USB storage device to your Firestick for more storage is entirely possible. See the videos for full details, or follow the written instructions below instead.  

Table of Contents

Getting Started

To add external USB storage to any Firestick or Fire TV, you must first prepare a few things.

  1. You will need to know which operating system your Firestick is running since adding more storage varies depending on the Fire OS.
  2. Decide how you will use the extra storage. Will you be using it as general, system, or mixed storage?
  3. Make sure the USB storage meets the requirements and is formatted correctly.
  4. The USB storage must be connected to the Firestick using an OTG cable or adapter (or plugged into a USB port on a Fire TV).

If you are unsure or have not yet prepared these four things, read my guide on How to Increase Firestick Storage. Then, when you are ready to begin, return to this post.
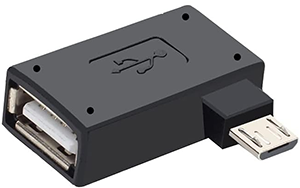
OTG Adapter

US Link
UK Link

OTG Cable

US Link
UK Link

Multi USB Hub

US Link
UK Link

Choose How to Use Firestick Storage (Fire OS 6)

Any Firestick or Fire TV running Fire OS 6 can use any type of storage. In other words, you can attach and use USB storage for general, system or mixed storage. 

Refer to How to Increase Firestick Storage for more information on these different types of storage.

Use Additional Storage as General Storage

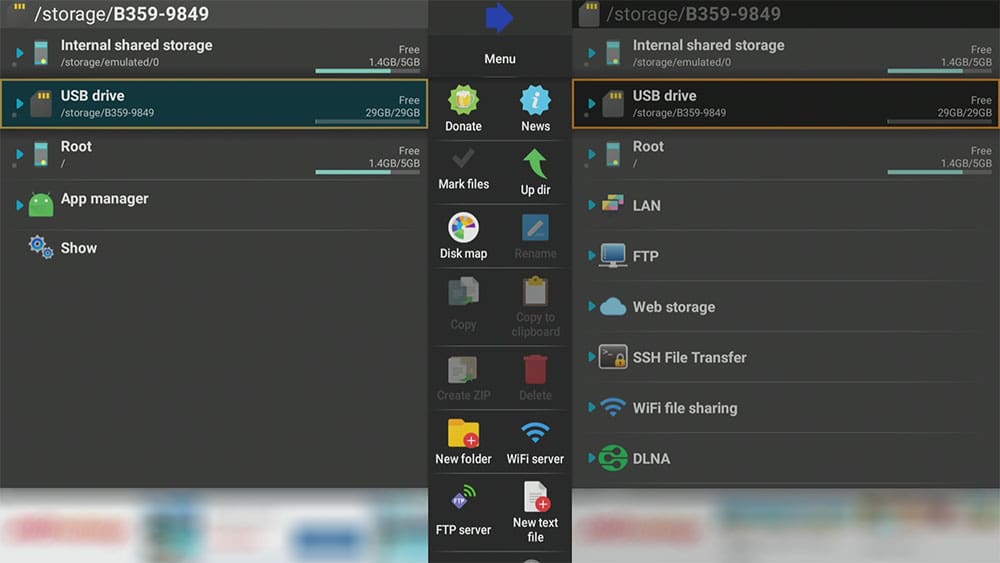
To use the USB storage as general storage, all you need to do is format it and connect it. There are several reasons why general storage can be helpful, including:

  • Access photos and videos stored on a USB drive connected to the Firestick. e best way to view media files on a USB drive would be to install a media player such as VLC or MX Player.
  • Share, save, explore, manage and transfer files between your Firestick internal and USB storage. I recommend using a file explorer application such as X-plore to do this. F
  • Find out how by taking a look at the following video or the guide: X-plore File Manager: How to Install and Use on Firestick

Use Additional Storage as System Storage or Mixed Storage

For Fire TV devices running Fire OS 6 to recognise additional storage and install apps to it, a line of code must be entered manually. This code alters the relationship between the Firestick and the attached USB storage. A partition is created on the USB storage that allows access by the system to read and write data. This will enable applications to be installed on the USB storage, freeing up space on the Firestick.

There are quite a few steps to this, but it shouldn’t take longer than 10 minutes, depending on your experience.

Fire OS 7 devices can handle the partitioning of attached USB storage automatically. They, therefore, do not require manual partitioning. If you’d prefer to upgrade to a Fire OS 7 device, then the Fire TV Cube 2nd Gen, Fire TV Stick Max, Fire TV Stick Lite and Fire TV Stick 3rd Gen all run Fire OS 7. Then look at my guide to Add More Storage to Firestick (Fire OS 7).
It is impossible to update Fire OS 6 devices to Fire OS 7.

If you want to continue adding more storage to your Fire OS 6 Firestick or Fire TV, follow the step-by-step video tutorial. Or, if you’d prefer, follow the written instructions below instead. 

Part 1 - How to Add System or Mixed Storage to Firestick (Fire OS 6)

Find Firestick IP Address and Turn On Developer Options
  1. Connect the USB storage to the Firestick using the OTG cable or adapter and power the Firestick up.
  2. From the Firestick Home screen, select Settings.
  3. Then choose My Fire TV.
  4. Select About.
  5. Then tap down over Network.
  6. Make a note of the IP Address.
  1. Tap the back button on your remote.
  2. Select Developer Options.
  1. Then select ADB Debugging to turn this option ON.
  2. Select Apps from Unknown Sources to also turn this option ON.

Part 2 - How to Add System or Mixed Storage to Firestick (Fire OS 6)

Install Remote ADB Shell

To input a line of code, an application called Remote ADB Shell is required. However, this app is not available on the Amazon App Store. It must therefore be sideloaded using the Downloader app.

  1. Install the Downloader app from the Amazon App Store (if you’re unsure how to download apps, then refer to Fire Stick – A Beginner’s Guide).
  2. Open the Downloader app, then select the Search box.
  3. Enter 28907, then select Go.
  4. Wait for my Downloads page to load fully, then press the Menu (or Options) button on your remote 2x to enter full-screen mode.
  5. Select the Tools category from the list at the top of the page. Or move down to view the Tools category.
  6. Find Remote ADB Shell in the list, then select it.
  7. On the next page, move down until you see the Download button.
  8. Select the Download button, then select Install.
  9. When the app has finished installing, select Delete 2x to remove the installation file, as it’s no longer required.

Part 3 - How to Add System or Mixed Storage to Firestick (Fire OS 6)

Connect Remote ADB Shell to Firestick

Use Remote ADB Shell to connect to the ADB Shell service of the Firestick to execute a terminal command.

  1. Open the Remote ADB Shell app.
  2. Select OK if you see a New Key Pair Generated message.
  3. Tap the Select button on your remote, then enter the IP Address you made a note of in step 6.
  4. Tap Next, then tap Next again.
  5. Select CONNECT.
  1. Select Always allow from this computer then select OK.

Part 4 - How to Add System or Mixed Storage to Firestick (Fire OS 6)

Find USB Storage (disk) Name
  1. Tap the select button on your remote to open the keyboard.
  2. Enter sm list-disks, then select Run.
  1. Press the back button on your remote to see and note the disk name.
    • In my case, it is 8,0 but yours may be different.

Part 5 - How to Add System or Mixed Storage to Firestick (Fire OS 6)

Input the Command Line to Partition Storage as System or Mixed Storage
System Storage
  • System storage – Allocating the whole of the USB drive to system storage will partition the whole drive to private storage. The USB drive will no longer be accessible to do other things like share or save files. You’ll no longer be able to see or use the USB storage as it will be used by the system exclusively. In this case, the command line required is:
    • sm partition disk:8,0 private (enter the disk name identified in step 28 if it is different to 8,0) 
Mixed Storage
  • Mixed storage – Allocating the USB drive as a mixed partition will allocate part of the USB drive as system storage and part of the USB drive as general accessible storage. In this case, the command line required is:
    • sm partition disk:8,0 mixed 50 (enter the disk name identified in step 28 if it is different to 8,0)

This command allocates 50% of the USB drive to system storage and 50% of the USB drive to general storage. Alternatively, you can specify the specific mix ratio to something different.

The number entered after mixed will determine the percentage allocated to general storage. For example, sm partition disk:8,0 mixed 20 will give 80% of the USB drive to internal storage and 20% to general storage.

Input the Command Line
  1. Tap down to place the cursor on the command line, then press the Select button on your remote to open the keyboard.
  2. Enter the command line to partition the storage to your preference.
    • sm partition disk:8,0 private
    • sm partition disk:8,0 mixed 50
  1. Double-check that the command line is correct. Else it will create an error. Then select Run.
  2. An Unexpected Removal message may appear in the bottom right of the screen. This message is normal to see.
  1. You have successfully executed the command if you can see the line mantis:/ $ listed in the background underneath the partition command.

Part 6 - How to Add System or Mixed Storage to Firestick (Fire OS 6)

Confirm Storage Partition was Successful

With Fire OS 6 devices, you cannot see the additional storage in the Fire TV settings: My Fire TV > About > Storage. This capability is available for Fire OS 7 devices only.

Run the disk-free command to show the total space available, space used and all available disk space for all currently mounted partitions.

  1. Enter the command df -h then select Run.
  2. Press the back button on the remote to view the partitions.
Internal Firestick Storage

The first line /dev/fuse     5.3G   4.7G   607M   89%   /storage/emulated
refers to the Firestick internal storage. The numbers on your screen will be different to show how the internal storage is used on your device. In my example:
5.3G = total useable storage
4.7G = storage being used
607M = storage remaining
89% = percentage of storage being used

USB System Storage

The second line /dev/block/dm-2     14G  36M   14G   1%   /mnt/expand/ (followed by a list of letters and numbers, this is the partition identification number)
refers to the part of the USB storage allocated as system storage. The numbers on your screen will be different to show how the internal storage is used on your device. In my example:
14G = total useable storage
36M = storage being used
14G = storage remaining
1% = percentage of storage being used

USB General Storage

The third line /dev/fuse     14G  320K   14G   1%   /storage/ (7005-1B04, this is the partition identification number)
refers to the part of the USB storage allocated as general storage. The numbers on your screen will be different to show how the internal storage is used on your device. In my example:
14G = total useable storage
320K = storage being used
14G = storage remaining
1% = percentage of storage being used

Installing Apps to the Firestick USB Storage (Fire OS 6)

You can use USB storage partitioned as system or mixed storage to install more apps. Most apps installed from here on will be installed to the part of the USB storage drive partitioned as system storage.

Check App is Installed to USB Storage
  1. Install an application from the Amazon App Store or my Downloads page.
  2. Then select Settings / Applications / Manage Installed Applications.
  3. Find the application within the list.
  4. Any app you install on the USB storage will display a USB icon.

If an application does not install to the USB storage, you can assume that the application developer has not set the permission. However, moving the app to USB storage is possible.

Move Apps to the Firestick USB Storage (Fire OS 6)

You might be able to move an application manually to the USB storage if it did not install there by default. Moving an application can be done in one of two ways.

  1. Move the app without keeping any application data.
  2. Move the app and keep application data.

Application data refers to but is not limited to: usernames, passwords, settings and favourites.

Move Apps to the Firestick USB Storage (Fire OS 6) - No Application Data

Applications can be manually moved to the USB storage using a file explorer application. This guide uses X-plore. Follow along with the step-by-step video tutorial. Or, if you’d prefer, follow the written instructions below instead.

Part 1 - Install X-plore

  1. Open the Downloader app, then select the Search box.
  2. Enter 28907, then select Go.
  3. Wait for my Downloads page to load fully, then press the Menu (or Options) button on your remote 2x to enter full-screen mode.
  4. Select the Tools category from the list at the top of the page. Or move down the page to view the Tools category.
  5. Find X-Plore in the list, then select it.
  6. Move down the next page until you see the blue Download button.
  7. Select the Download button, then select Install.
  8. When the app has finished installing, select Delete 2x to remove the installation file, as it’s no longer required.

Part 2 - Move the Application

  1. Open the X-plore app, then select Allow when asked if X-plore can access files.
  2. On the right-hand side of X-plore, select Internal shared storage.
  3. Then tap down and select the Downloader folder.
  4. Tap over to the left-hand side of X-plore, then choose App manager.
  5. Then select Installed.
Find the App You Want to Move
  1. Tap down and highlight the app you want to move.
  2. Press and hold the select button on the remote, then select Move.
  3. Select OK to confirm.
  4. Then select OK to uninstall the app.
    • Selecting Move uninstalls the app, then copies the APK (install file) to the Downloader folder.
  1. Tap over to the right-hand side, back to the Downloader folder, and select the APK file for the app you moved.
  2. Select Install, then select Done.

Part 3 - Confirm the Application Installed to the USB Storage

  1. Select Settings / Applications / Manage Installed Applications from the Amazon Home screen.
  2. Find the application within the list.
  3. A USB icon will display adjacent to any app installed on the USB storage.

Move Apps to the Firestick USB Storage (Fire OS 6) - Keep Application Data

Moving an application to the USB storage whilst keeping the application data requires an ADB command. The command uses the app’s package name and the partition identification number of the USB storage drive allocated to system storage.

Follow along with the step-by-step video tutorial. Or, if you’d prefer, follow the written instructions below instead.

Part 1 - Find the Package Name

Install X-Plore

You can find the correct package name using the X-plore application. If you do not already have X-plore installed, then continue with the following steps to install it. If you do have X-plore installed, skip ahead to step 9.

  1. Open the Downloader app, then select the Search box.
  2. Enter 28907, then select Go.
  3. Wait for my Downloads page to load fully, then press the Menu (or Options) button on your remote 2x to enter full-screen mode.
  4. Select the Tools category from the list at the top of the page. Or move down to view the Tools category.
  5. Find X-Plore in the list, then select it.
  6. On the next page, move down until you see the blue Download button.
  7. Select the Download button, then select Install.
  8. When the app has finished installing, select Delete 2x to remove the installation file, as it’s no longer required.
Get the Package Name
  1. Open the X-plore app, then select Allow when asked if X-plore can access files.
  2. On the left-hand side of X-plore, select App manager.
  3. Then select Installed.
  1. Tap down and highlight the app you want to move.
  2. Note the package name as displayed directly underneath the application name.
    • In this example, to move the Set Orientation application, the package name is com.googlecode.eyesfree.setorientation 

Part 2 - Find the Partition ID

Find and note the partition ID allocated to additional USB system storage.

  1. Open Remote ADB Shell and connect.
  2. Enter the command df -h
  3. Make a note of the /dev/block/dm-2 partition ID listed after mnt/expand – in this example it is 8045e23a-7a87-487c-944c-8c1d6827e4e1

Part 3 - Move the Application

  1. Enter the command line to move the application and its data to the USB storage.
    • pm move-package [packagename] [partition ID]

In this example, to move the Set Orientation app, I have entered:
pm move-package com.googlecode.eyesfree.setorientation 8045e23a-7a87-487c-944c-8c1d6827e4e1

  1. Double-check for any mistakes. Any spelling mistake will cause the command to fail in execution.
  2. Select Run, then press the back button on the remote.
  1. You’ll see a Success message on the screen if everything is correct.

Part 4 - Confirm the Application Installed to the USB Storage

  1. Select Settings / Applications / Manage Installed Applications from the Amazon Home screen.
  2. Find the application within the list.
  3. A USB icon will display adjacent to any app installed on the USB storage.

Wrapping Up

This guide taught you how to add more storage to your Firestick or Fire TV. You also learnt how to use Remote ADB Shell to input commands, partition the USB storage and move applications. If you need further help or have questions, select one of the following options. 

PROGRESS:

6 Comments

  1. Hello, great tutorial, I’ve tried it to make it so my USB is mixed storage. except I still can not see my 256 GB USB 3.0 Sandisk drive when you to to My FireTV > About > Storage. Fire TV is up to date to Fire OS 6. Can you help?

    • Hi. Once you add storage to any Fire OS 6 device, you won’t be able to see the storage. The storage space can be checked by issuing the disk-free command as shown in Part 6 above.
      Fire OS 7 devices can see the storage in the Fire TV settings but Fire OS 6 devices can not.

  2. After I run the df -h command I see my storage in /dev/fuse. When I ran the df -h command to get my /dev/block/dm-2 information no information is shown. Is there something else I can do to get this information so that I can move my apps to usb drive. I have my usb set up as mixed 50/50.

    Thanks
    Stacy

    • Hello Stacy, it seems that the partition process for your storage was not successful. Had it been successful, you would have seen it listed. You might have to reformat your storage to FAT32 and try partitioning it again.

  3. Tanya,

    You have the best firestick videos that I have seen.
    Your clear, calm manner makes it easy to understand and follow.

    You are the best.

    Thanks for your efforts and time.

Leave a Reply

Your email address will not be published. Required fields are marked *

Post comment

Share this article:
Facebook
Twitter