How to Record IPTV from Firestick or Android to PC

If you are a fan of IPTV services and prefer using Tivimate as your primary IPTV player, you can easily set up a home DVR system. You can use your PC to record IPTV content from any of your streaming devices with TiviMate installed, whether it’s an Amazon Firestick or an Android-powered streaming device.

However, the configuration process involves several essential steps that, once completed, will significantly enhance your viewing experience. This post will walk you through the detailed step-by-step process to make sure you have a seamless setup.

The Amazon Firestick, a top contender in the streaming device market, is particularly popular for its affordability and the ease with which it can be jailbroken. With just a few straightforward adjustments, you can unlock its full potential, making it an attractive option for those looking to break free from traditional cable TV.

Table of Contents

Why Use TiviMate to Record IPTV?

Many IPTV Players offer the option to record from your IPTV service. However, TiviMate is undoubtedly one of the best options, thanks to its unique features, which many other players lack.

Despite the need to upgrade to TiviMate premium to enjoy its full benefits, the convenience it offers is unparalleled.

With TiviMate, you can use it as a DVR system, create custom recordings, and set recording schedules to easily record your favourite weekly or daily shows, relieving you from the hassle of missing any show.

An example of what the Unlinked file sharing app looks like
click on image to enlarge

Is Other Equipment Required?

I recommend using a Windows PC to create a centralised location where TiviMate can record. This ensures you can access all your IPTV recordings from TiviMate from any device with Tivimate installed and connected to the same home network.

This approach also offers significant benefits.

  1. By freeing you from the storage constraints of streaming devices like Firesticks. With a Windows PC as the centralised location, you can record without worrying about quickly running out of space.
  2. You no longer have to worry about file size limitations. Android-based systems (including Firestick) restrict users to file sizes up to 4GB.

By creating a centralised location on your Windows PC, you’ll have much more storage space, allowing you to keep your recordings longer without deleting them to make space for more programs.

An example of what the Unlinked file sharing app looks like
click on image to enlarge

How to Get Started

To get started and create the perfect set-up to record IPTV from TiviMate and access your recordings on any device, you’ll need to:

  1. Ensure you have access to a Windows PC.
  2. Have an IPTV subscription. If you still need an IPTV provider, check out my list of IPTV Reviews for recommendations.
  3. Unlock TiviMate Premium. If you need to learn how to do that, check out this post on how to Unlock Tivimate Premium.

Once you have all of the above in place, the rest of this guide will explain step-by-step how to set up a recording location on your PC and point TiviMate on your Firestick or Android to the recording location on your PC. 

Message prompt to Unlock Premium TiviMate
click on image to enlarge

1. Create a Folder to Store IPTV Recordings.

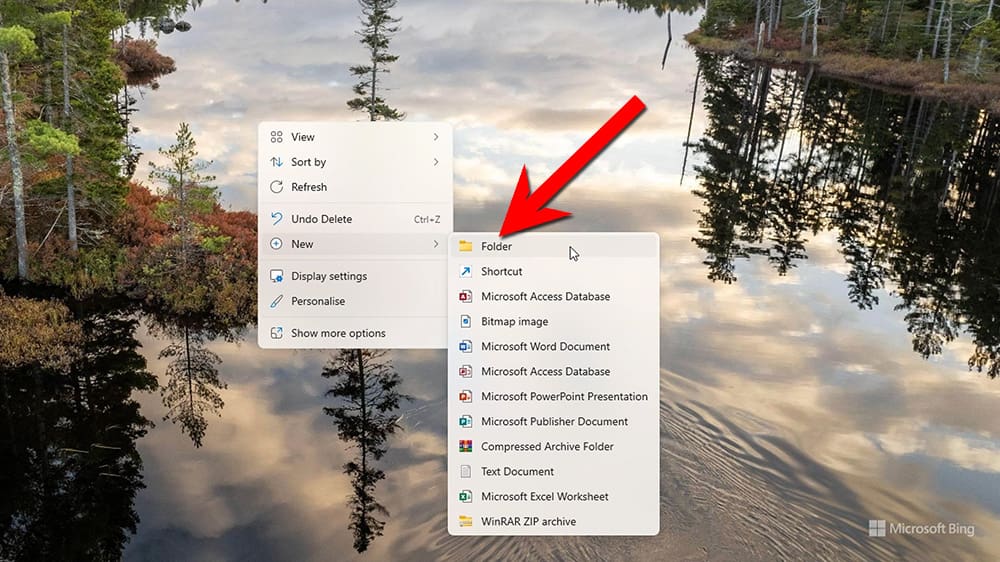
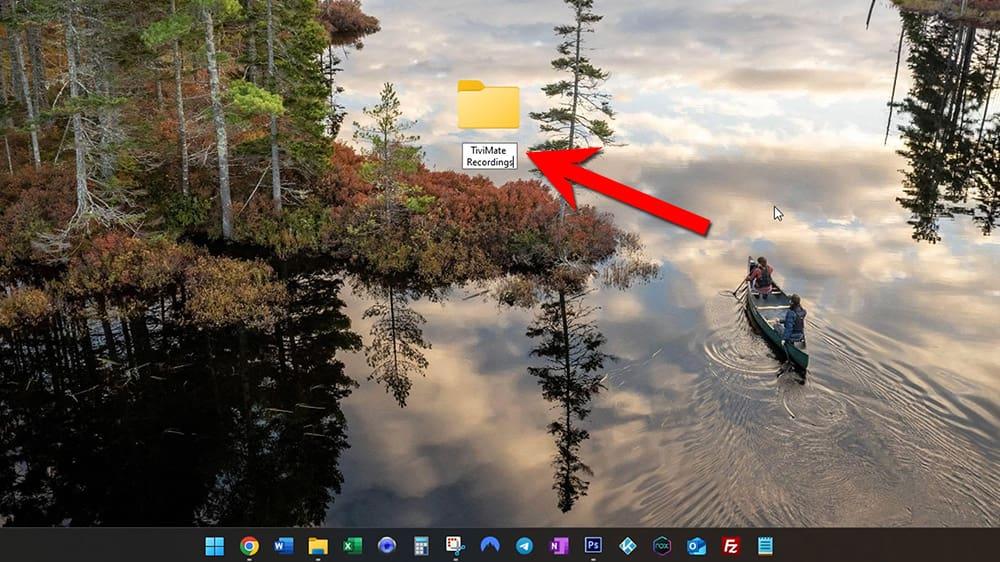
The first step is to create a folder on your Windows PC to store all of your IPTV recordings from TiviMate.

  1. Right-click on your Windows desktop and select New, then Folder
Create a new folder on your PC for IPTV recordings from TiviMate
click on image to enlarge
  1. Enter a name for the new folder. I suggest naming the folder TiviMate Recordings.
Enter a name for your IPTV Recordings folder
click on image to enlarge

2. Change the Folder Properties

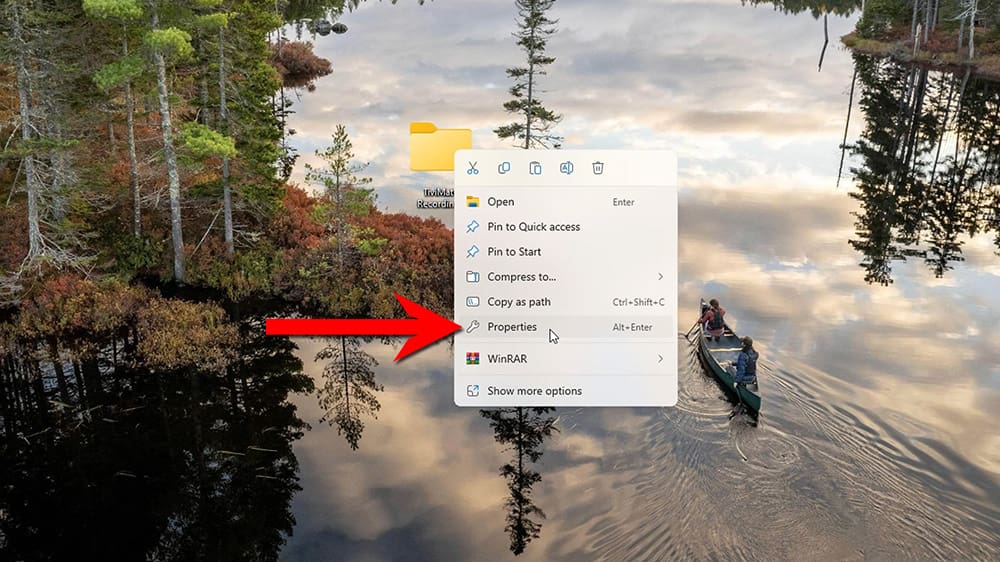
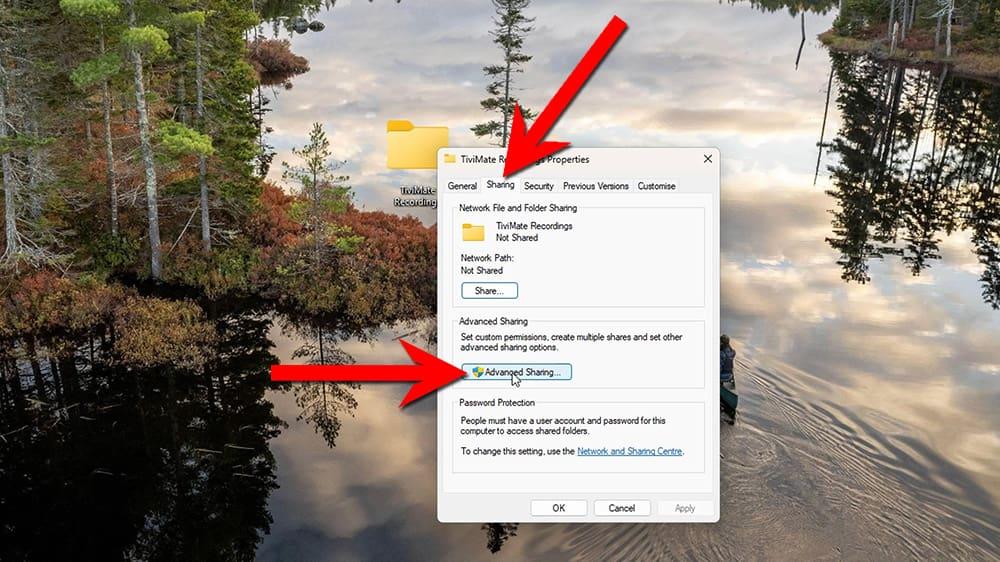
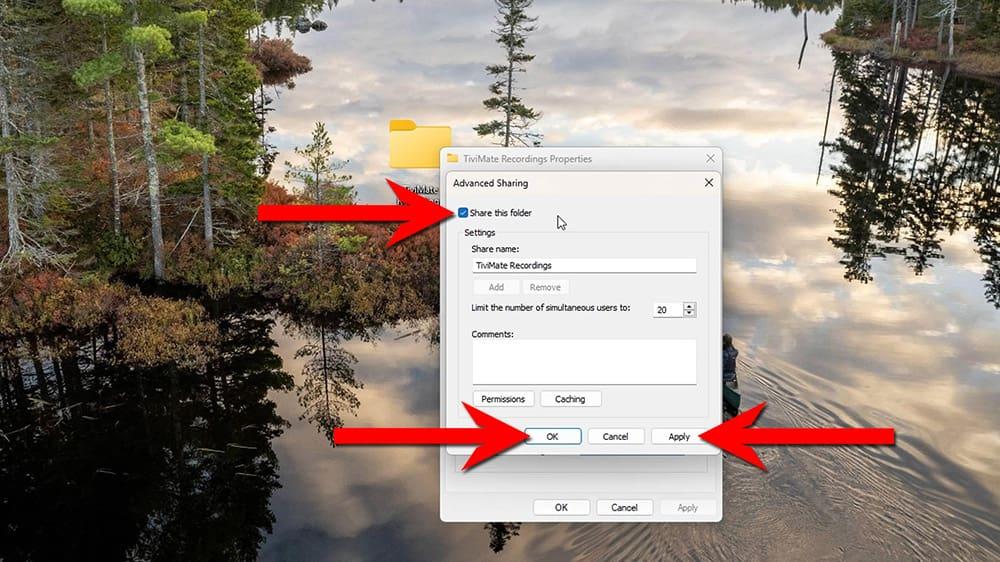
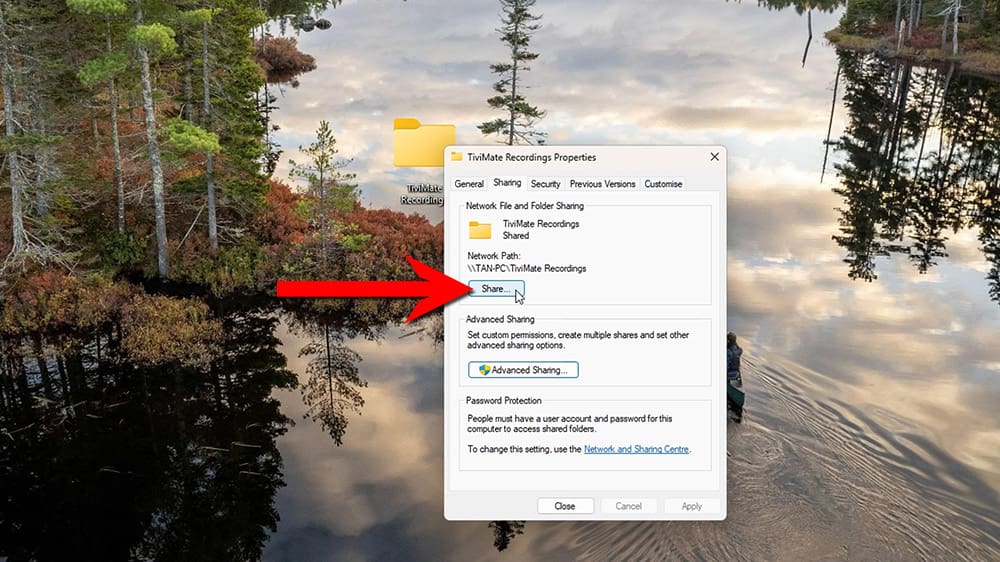
Now that the TiviMate Recordings folder has been created, the folder needs to be shared to make it accessible to others.

  1. Right-click over the TiviMate Recordings folder and choose Properties.
Open the properties of the IPTV recordings folder
click on image to enlarge
  1. Select the Sharing tab.
  2. Then click on Advanced Sharing.
Open Advanced Sharing settings to record IPTV
click on image to enlarge
  1. Click the check box to Share this folder.
  2. Then, click Apply.
  3. Next, select OK.
click on image to enlarge

3. Choose who to Share the Folder with

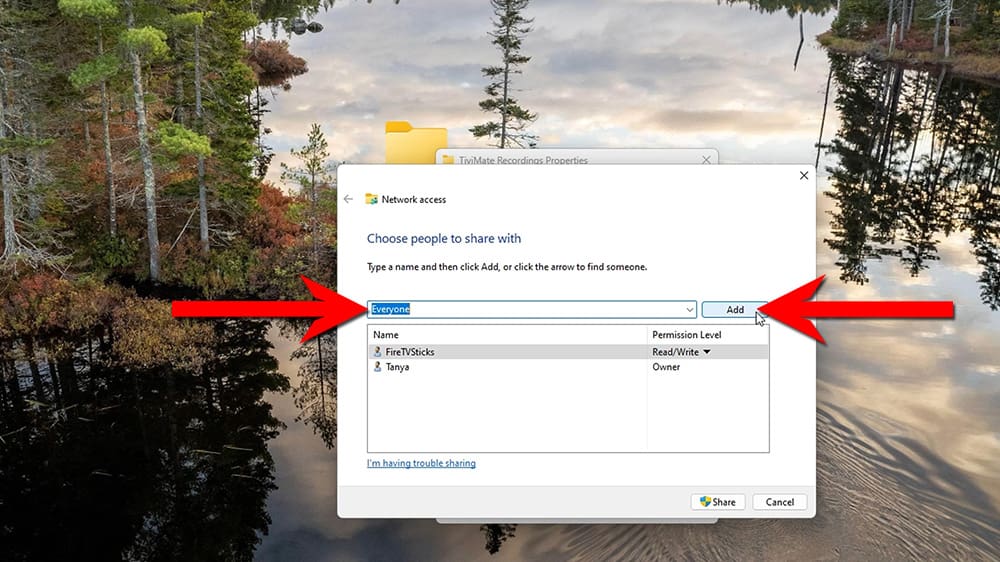
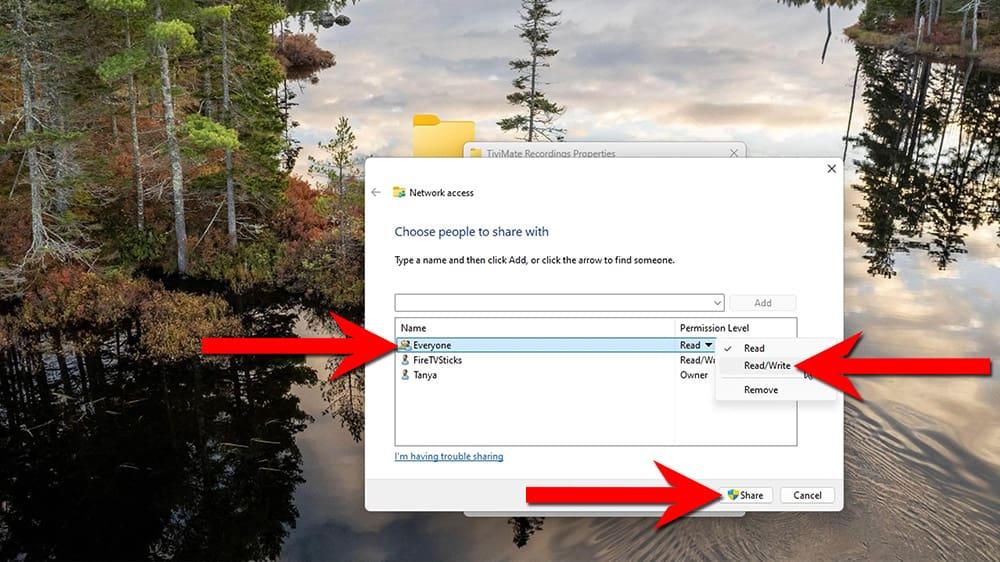
Now, you must specify who can access the shared TiviMate Recordings folder.

  1. Click on Share.
Continue changing the properties to share the IPTV Recordings folder
click on image to enlarge
  1. Select the drop-down box and choose Everyone.
  2. Then, click Add.
Share the IPTV Recordings folder with everyone
click on image to enlarge
  1. Everyone will now be added to the box below.
  2. Right-click on Everyone.
  3. Then, select the Read/Write option from the menu.
  4. Next, click the Share button.
Give everyone read/write access to the IPTV Recordings folder
click on image to enlarge
  1. Click Done.
  2. Then, Close the properties menu.

4. Make the Folder Accessible Across your Network

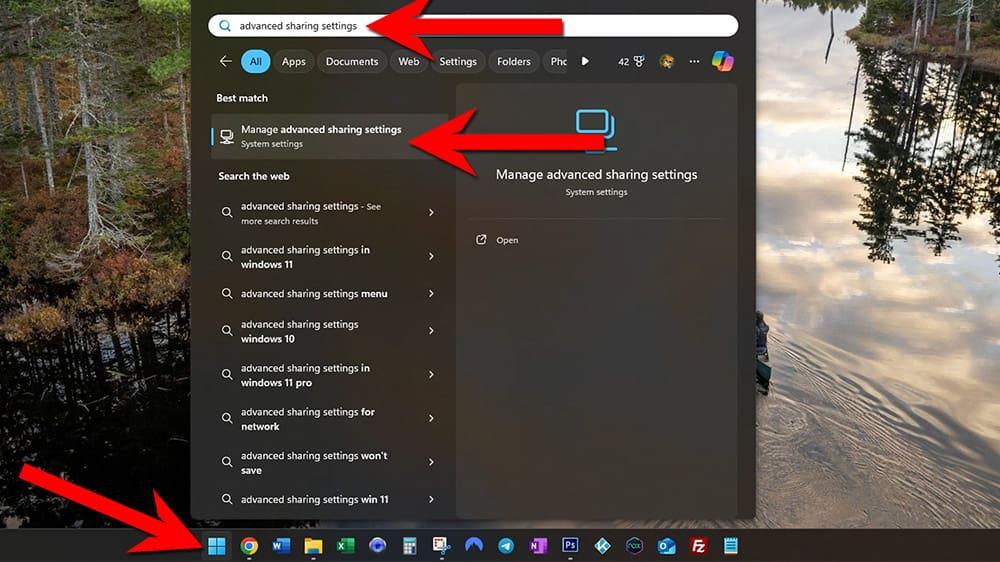
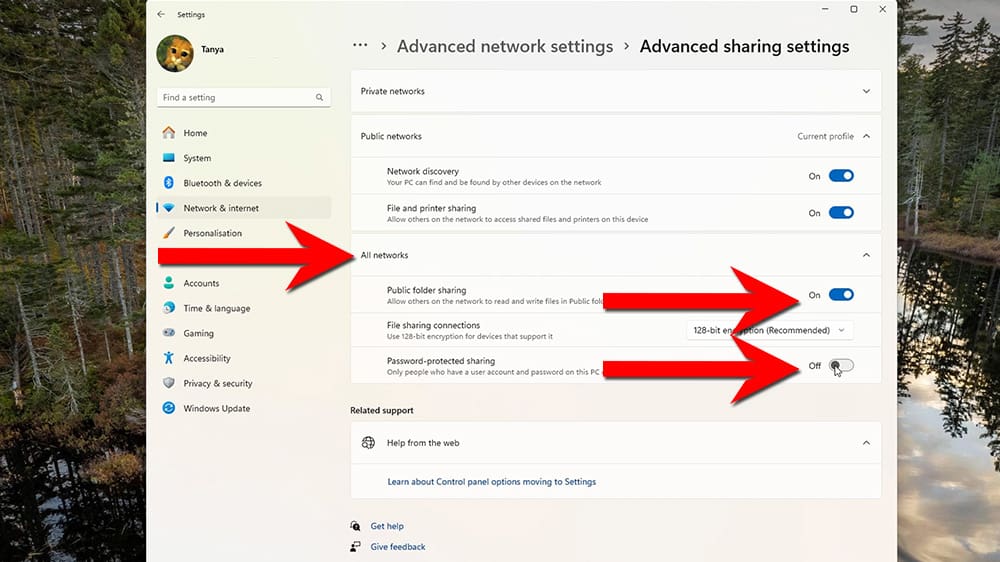
Now that the folder has been set up with the appropriate permissions to share its contents, it is essential to adjust your PC’s network sharing settings to ensure that all users on your network can access the shared folder.

  1. Click the Start (or Windows) button and type advanced sharing settings.
  2. Then click manage advanced sharing settings.
Manage advanced sharing settings to share the IPTV Recordings folder
click on image to enlarge
  1. Click All networks to expand the options.
  2. Select the Public folder sharing option to turn it ON.
  3. Next, select the Password-protected sharing option to turn it OFF.
  4. Close the box by clicking X in the top right-hand corner.
click on image to enlarge

5. Find the IP Address of your PC

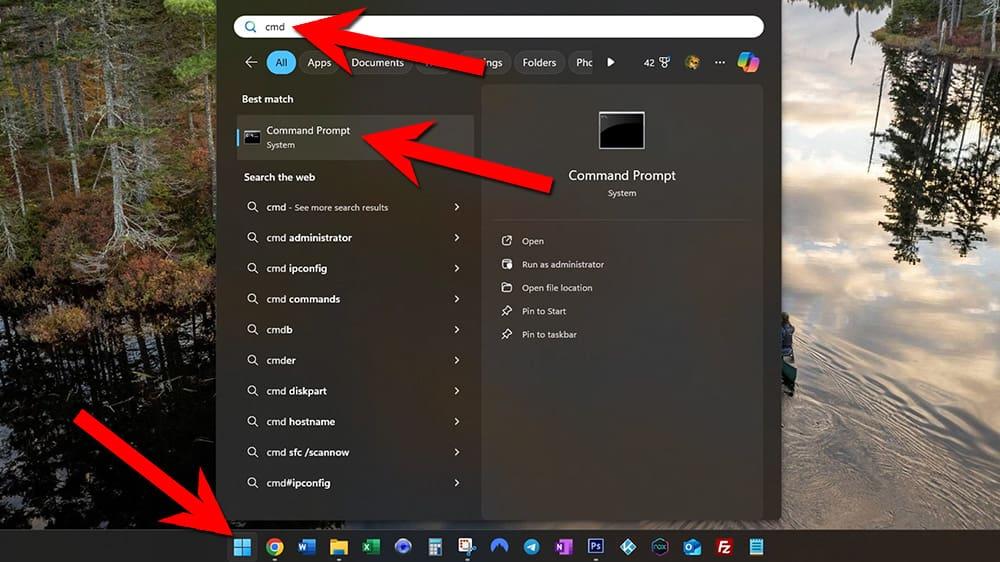
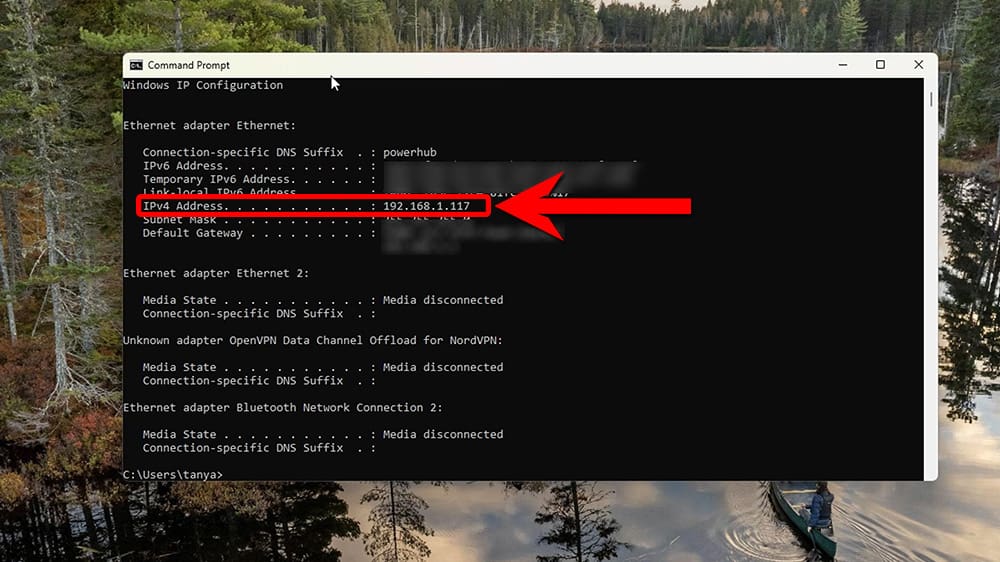
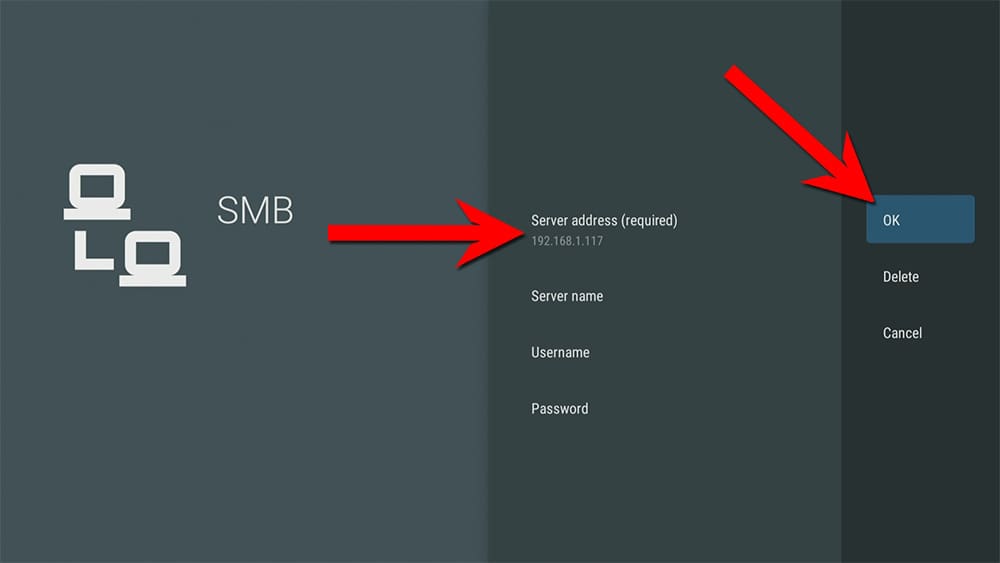
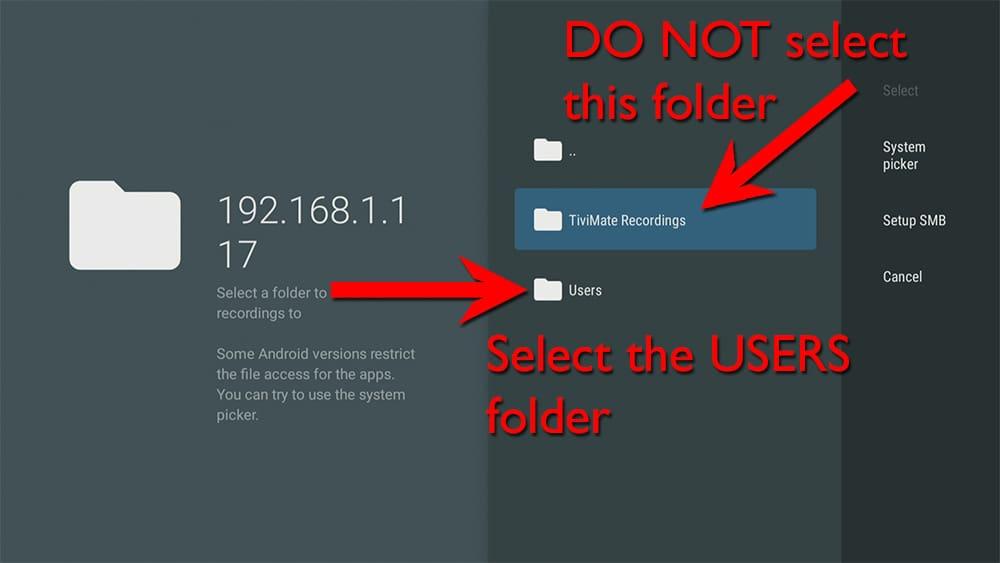
The TiviMate Recordings folder on your PC is now accessible to everyone on your network. To access this folder from TiviMate on your Firestick or other streaming device, you’ll need to find your PC’s IP address and connect to it.

  1. Click the Start (or Windows) button and type cmd.
  2. Then, click on Command Prompt to open it.
click on image to enlarge
  1. Type ipconfig and hit enter.
  2. Find and make a note of your IPv4 address.
Find your IP address to share the TiviMate Recordings folder
click on image to enlarge

6. Change TiviMate Recording Location

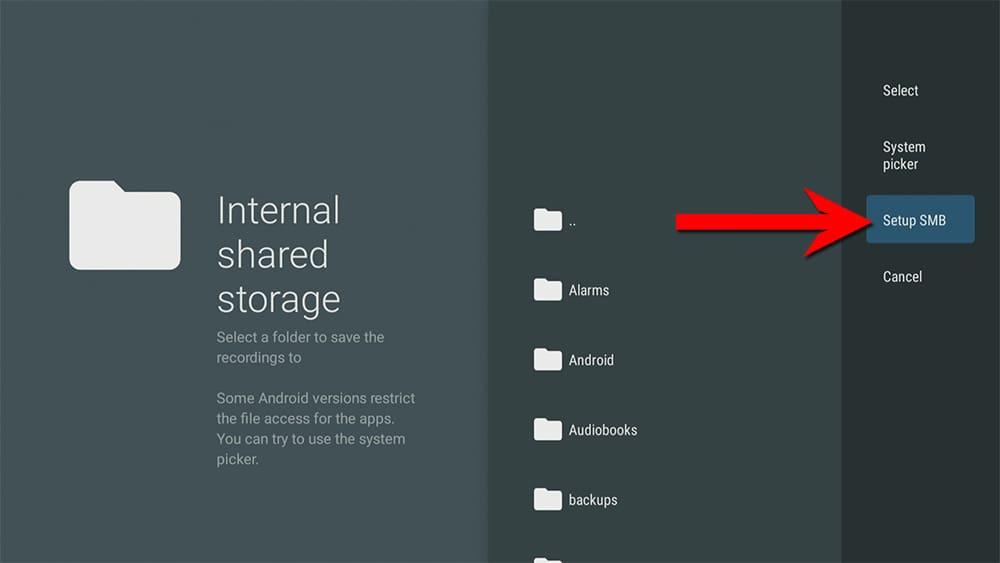
The final steps involve changing the location where TiviMate saves recordings. If you have TiviMate installed on multiple devices, you will need to complete these steps on each device to ensure that all devices can save and access recordings from the same location.

  1. Open TiviMate on your Firestick or your other streaming device and tap to the left to access the Settings menu.
TiviMate IPTV Recordings settings
click on image to enlarge
  1. Select Other.
  2. Then, select Recording.
  3. Select the Recordings folder.
  4. Choose Select folder.
  5. Next, tap over to the right and select Setup SMB.
Setup SMB to record IPTV to your PC
click on image to enlarge
  1. Select Server address.
  2. Type the IP address you made a note of earlier and click Next.
  3. Then, click OK.
Enter a server address in TiviMate to save IPTV recordings to
click on image to enlarge
  1. Select your IP address from the list.
  2. DO NOT select the TiviMate Recordings folder that shows first in this list. Instead, you MUST select Users and then navigate to the TiviMate Recordings folder. 
Select the TiviMate Recordings folder from the USERS folder
click on image to enlarge
  1. Once you have navigated to the TiviMate Recordings folder on your desktop, tap over to the right and click Select.
  2. Click OK.
Save the location that IPTV Recordings from TiviMate are saved to
click on image to enlarge

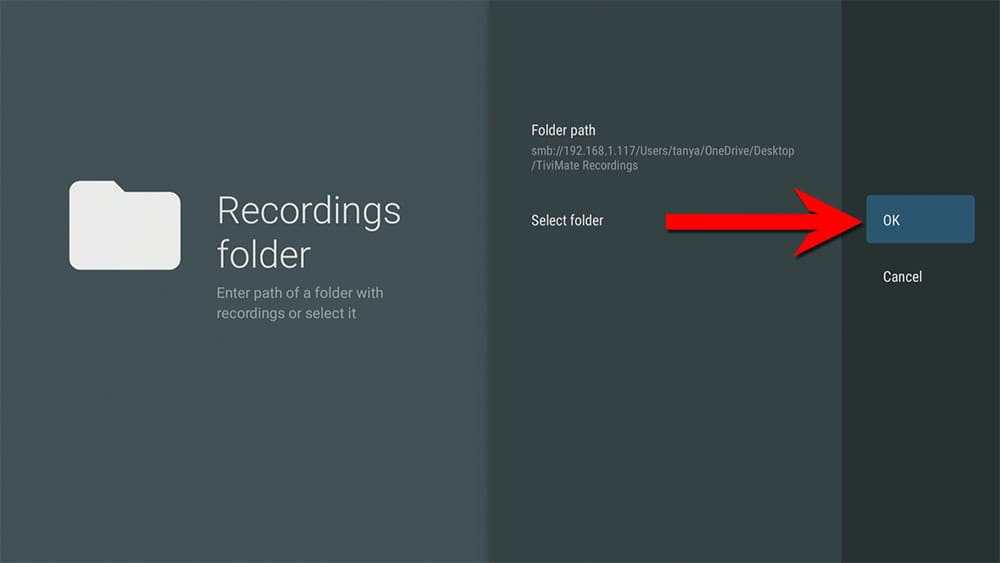
The recording location for TiviMate has been updated to the TiviMate Recordings folder on your desktop. Any recordings you start or schedule on this device will now be saved to the TiviMate Recordings folder on your PC.

Please ensure that your PC is powered on and not in sleep mode for the recordings to be successful.

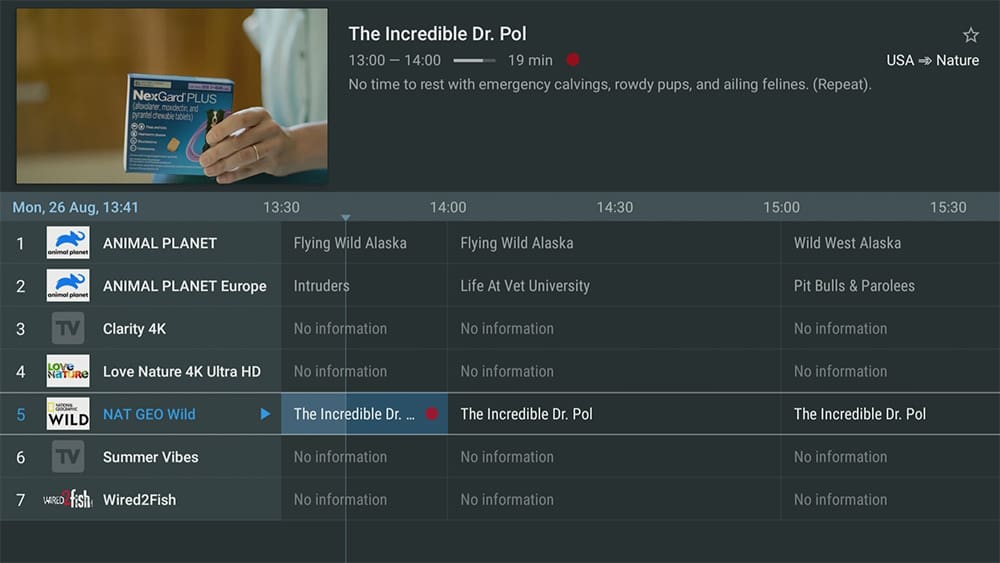
Start a recording and verify that a red dot is displayed next to the program, indicating that the recording is in progress.

click on image to enlarge

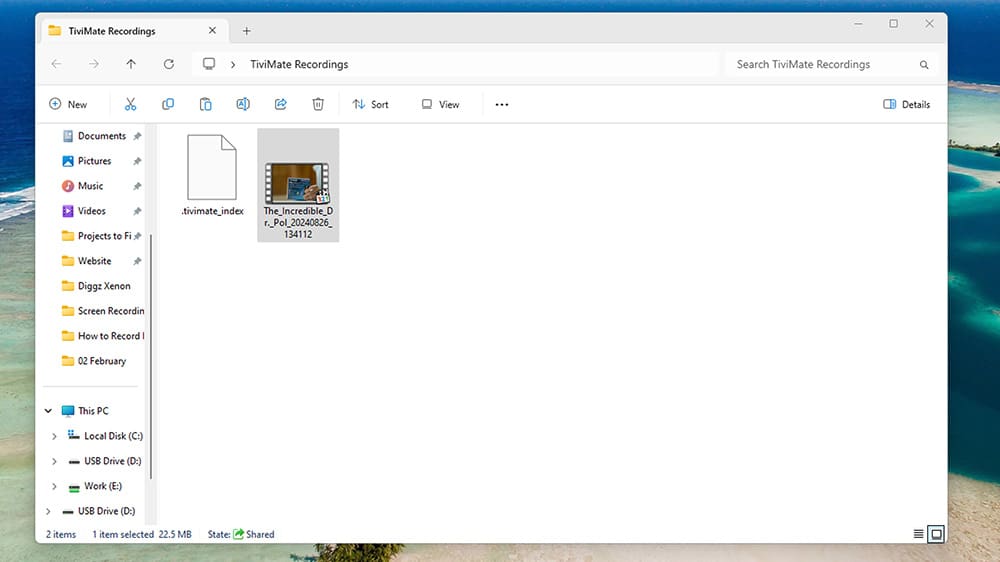
You can access and watch the files on your Windows PC or any device connected to your home network.

Access your IPTV Recordings from TiviMate on your PC
click on image to enlarge

Wrapping Up

By following this guide, you have learned how to set up IPTV recordings from TiviMate to your PC, allowing access from any device on your home network. Despite the many steps involved, this only needs to be done once. Once set up, you can continuously enjoy hours of recordings and never miss your favourite shows!

PROGRESS:

Leave a Reply

Your email address will not be published. Required fields are marked *

Post comment

Share this article:
Facebook
Twitter